30 days of Rust - Day Thirty - Game Of Life - continued
 The final day of the 30 day challenge. It's really amazing to see how quickly time goes by. There's a saying my late brother Lesiba always said to me.
Do or you don't, time will pass. The question is, 'What will you have achieved at the end of that time frame?'
So for me, I am certain that I will now be able to take on more projects that require Rust such as Blockchain development.
If you just got here, please check out my previous posts, from where I started building the Game of Life application from day 29.
Day 30 - Interactive Game Of Life
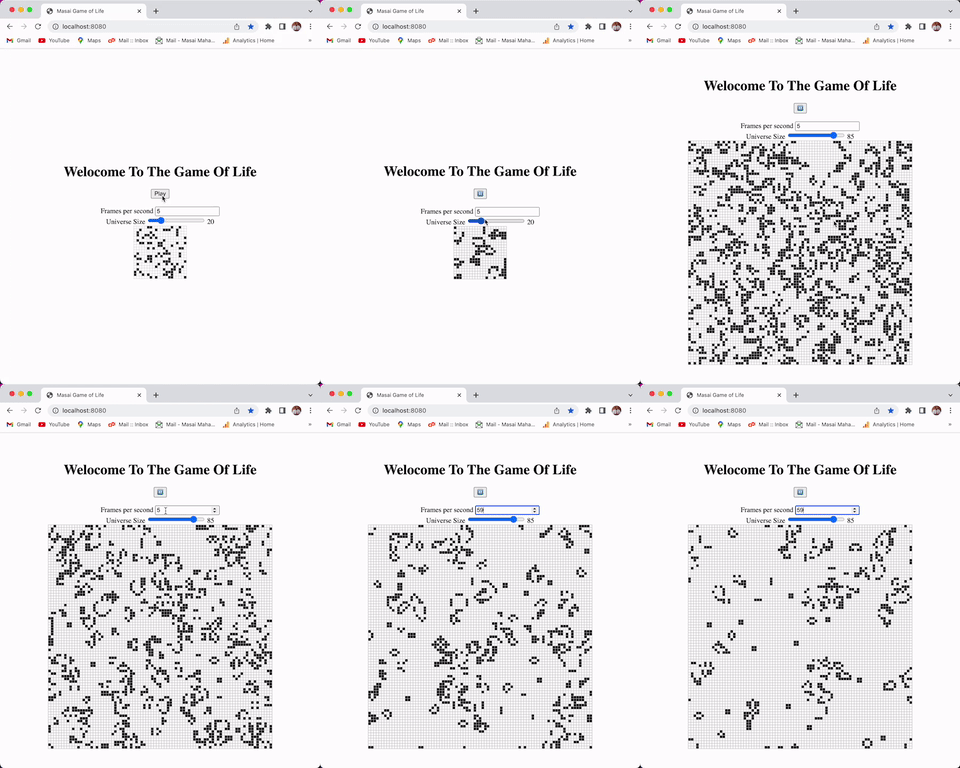
So from the previous post, the game of life already works well according to the rules. Now I have decided to improve 4 aspects of it. Namely;
- Pause & Play Functionality
- Control Play Speed
- Randomize spawning of Alive Cells
- Control the size of the Universe
The product of these changes now looks like this;

Let's dive into the changes made.
Pause & Play
In order for the game to be able to pause and play at any given time, I added a button to toggle the state.
<button id="play-pause">Play</button>
Previously, the render_loop was called directly. Now I added a play function to call it. The requestAnimationFrame function returns an integer which identifies the callback. We can use this to cancel the animation later with the cancelAnimationFrame function. We can set animationId to null initially, and to the value returned by the animation inside the render_loop.
const isPaused = () => {
   return animationId === null;
}

const play = () => {
   playPauseButton.textContent = "⏸";
   renderLoop();
}

const pause = () => {
   playPauseButton.textContent = "▶";
   cancelAnimationFrame(animationId);
   animationId = null;
   userPressed = false;
}

let userPressed = false;

playPauseButton.addEventListener("click", event =>{
   userPressed = true;
   if(isPaused()){
       play();
   } else {
       pause();
   }
});
I then updated the render_loop method to only run if the user initiated the play by clicking the play button.
const renderLoop = () => {
   if (!userPressed){
       return;
   }
   drawGrid();
   drawCells();

   universe.tick();
   const fps = numframes.value;


   animationId = requestAnimationFrame(renderLoop);
}
Dictate speed
The user can now tell how fast the game plays by changing frames per second. I added a numerical input box which controls how many frames per second should be rendered.
<div>
     <label for="frames">Frames per second</label>
     <input id="frames" type="number" min="1" value="5"/>
</div>
Everytime the frame renders, It checks the value of the input box. I then apply a sleep method, which pauses execution for a set number of milliseconds. Since there are 1000 milliseconds in one second, I apply a waiting time of 1000/fps milliseconds. So the more the frames per second, the less the sleeping time and the faster the simulation is.
const numframes = document.getElementById("frames");

function sleep(ms) {
   return new Promise(resolve => setTimeout(resolve, ms));
}

const renderLoop = () => {
   //...
   const fps = numframes.value;

   sleep(1000/fps).then(()=>{
       animationId = requestAnimationFrame(renderLoop);
   })
}
Random Spawning
Everytime you play, I initialize the Cell states randomly. For this I had to add the rand crate. I added getrandom too in order to generate random numbers. This is because rand does not currently support web assembly, while getrandom has support for javascript.
rand = {version = "0.8.5"}
getrandom = { version = "0.2", features = ["js"] }
Now when the universe is initialized, a random number between 0 and 3 is generated. If the number is 3, then a cell comes to life, else it is initialized as a Dead cell.
pub fn new() -> Universe {
       //...
       let cells = (0..width * height)
           .map(|i| {
               let num = rand::thread_rng().gen_range(0..4);
               if num == 3{
                   Cell::Alive
               } else {
                   Cell::Dead
               }
           }).collect();
   //...
   }
Now you can see all sorts of new random patterns.
Increase universe Size
To have control of how big you want the universe to be, I created a slider to allow the user to control this.
<div id="slidecontainer">
    <label for="cell-range"> Universe Size</label>
     <input id="cell-range" type="range" min="1" max="100" value="20" class="slider" id="myRange">
     <span id="range-value"></span>
   </div>
Everytime the value of the slider changes, a new Universe is created. This new Universe has the width and height of whatever the value of the slider is. The size of the universe can be changed at any time.
const rangeValue = document.getElementById("range-value");

cellRange.oninput = function (){
   universe = Universe.new(parseInt(cellRange.value));
   let value = parseInt(cellRange.value);
   rangeValue.innerHTML = value;

   width = universe.width();
   height = universe.height();
   canvas.height = (CELL_SIZE +1 )* height +1;
   canvas.width = (CELL_SIZE +1) * width +1;
   drawGrid();
   drawCells();
}
Conclusion
I feel like I've come a long way. This application really taught me a lot about the inner workings of Web Assembly. Exposing our Rust code to Javascript works wonders.
The best part about building this game was, I actually got to play it for a couple of hours. Seeing all the beautiful patterns that can emerge from such simple rules. By merely changing the state of a cell from Alive to Dead, can change the course of the entire game.
Life is beautiful and I am grateful to be in this position and learning everyday.
Thank you so much for staying with me throughout this journey. I hope you learnt as much as I have. Please reach out to me on Instagram, Twitter or LinkedIn as to what you are learning next and I will share your journey too.
Until next time. Peace ✌🏼 .
