30 days of Rust - Day Twenty Six - Blog Backend
 Previously I built the capability to have multiple pages on my web application. View my previous post here for better context. Most of the pages are static and do not need any external data. This is with the exception of the blog posts. The blog posts need to be pulled in from somewhere, such as a server which has a database or text files.
This is exactly what I built today.
Day 26 - Blog Backend
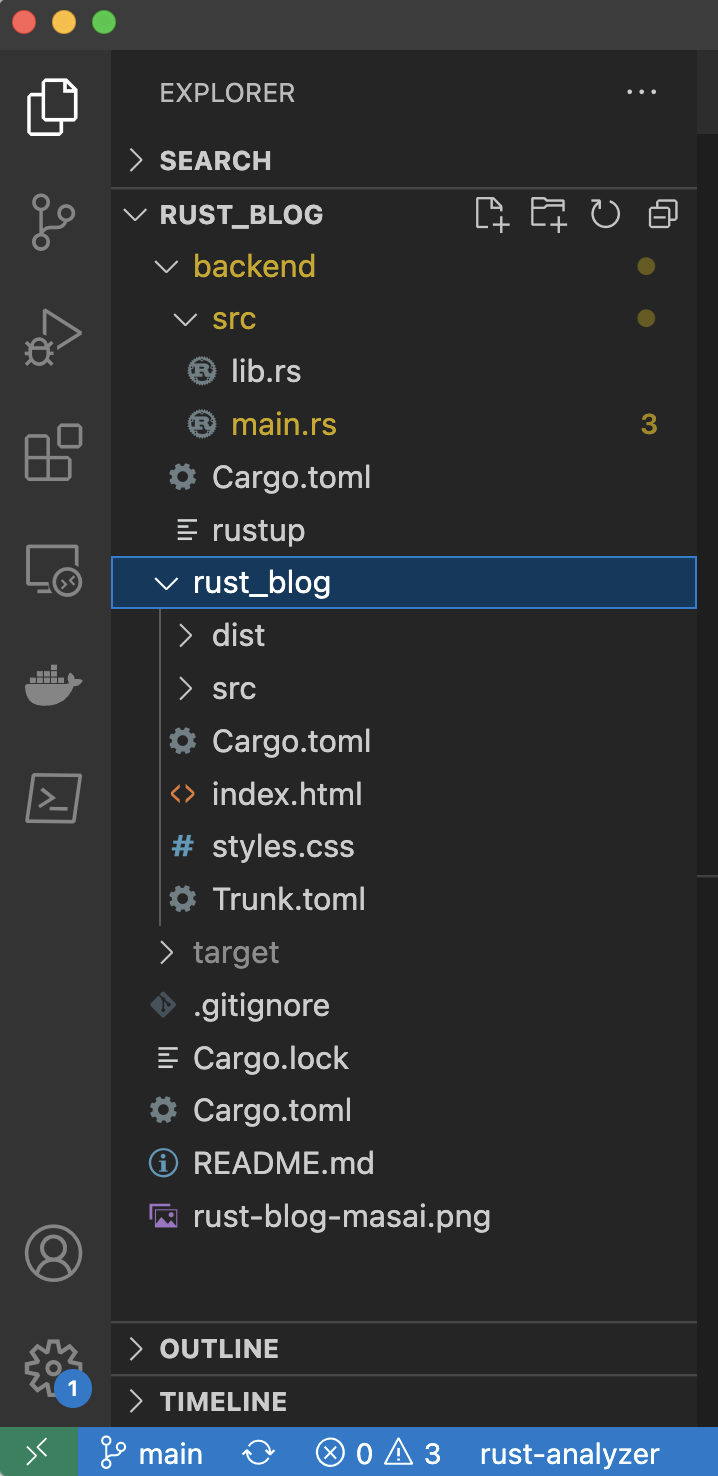
The server will be a different application, so I had to first create a workspace. Basically I created a folder called backend which contains the server code and rust_blog which contains the frontend code. Each of these have a Cargo.toml file with their own dependencies and then the parent folder being the workspace has a Cargo.toml file which looks like this;
[workspace]
members = ["rust_blog", "backend"]
default-members=["backend"]
The file structure looks like;

Installing Actix web
In order to build the server, I used a crate called actix web. This allows us to quickly spin up a server in Rust that can accept requests from our frontend.
In order to install actix web, add the following dependency to the Cargo.toml file.
actix-web = "4"
Creating an endpoint
So basically an endpoint is a function that is connected to a url. So "https://travcar.co.za" is an endpoint that returns a beautiful web page. The function can return anything, but most backend endpoints return JSON objects. Actix web allows us to do this easily. The crate Serde helps with conversion of Rust objects to and from JSON. Add the following dependencies;
serde = {version = "1", features=["derive"]}
serde_json = "1.0"
Then I had to define what a Post looks like. Basically it has 3 String fields namely id, title and content. It should derive Serialize, which means it can be turned into json. Clone allows us to clone the object which will be useful later.
use serde::Serialize;
#[derive(Serialize, Clone)]
struct Post {
   id: String,
   title: String,
   content: String
}
We want the frontend to access specific blog posts on the following url http:://localhost:8000/blog/{id} where id is the identifier of a blog post. It is a GET method. You can have a look at the various HTTP methods available here.
use actix_web::{web , get,
   http::header::ContentType,
   http,
   body::BoxBody,
   App,

    Responder, HttpResponse, HttpServer};

#[get("/blog/{id}")]
async fn blog_post(id: web::Path<usize>, data : web::Data<AppState>) -> impl Responder {
   let first = &data.posts.get(0);
   let x = first.unwrap();
   Post {
       id: x.id.clone(),
       title: x.title.clone(),
       content: x.content.clone()
   }
}
This will not work yet because we still need AppState and all of our endpoints need to return a type that implements the Responder trait.
Responder Trait
In order for our endpoint to be allowed to return the Post strut, we have to implement the Responder trait. Effectively the respond_to method is where the object gets turned into JSON so it can be sent through the web.
// Responder
impl Responder for Post {
   type Body = BoxBody;

   fn respond_to(self, req: &actix_web::HttpRequest) -> HttpResponse<Self::Body> {
       let body = serde_json::to_string(&self).unwrap();

       HttpResponse::Ok()
       .content_type(ContentType::json())
       .body(body)
   }
}
Dummy Data
In order to have posts to return, for now I created dummy data by using App State. This is just a global struct accessible to all endpoints. It has just one field called posts which houses a Vector of Posts.
#[derive(Serialize)]
struct AppState {
   posts: Vec<Post>,
}
Creating a list of posts that will be added to AppState.
let all_posts = vec![
               Post {
                   id: String::from("1"),
                   title: String::from("hahah title"),
                   content: String::from("This is the coolest")
               },
               Post {
                   id: String::from("2"),
                   title: String::from("Masai vs Floyd Mayweather"),
                   content: String::from("Masai smashes Mayweather in London")
               }
           ];
The server
The #[actix_web::main] macro runs the main function which allows for async operations. A new instance of an HttpServer is created and we add AppState as part of app_data. This makes it available to all the endpoints in this application.
#[actix_web::main]
async fn main() -> std::io::Result<()> {
   HttpServer::new(|| {
           let all_posts = vec![
               Post {
                   id: String::from("1"),
                   title: String::from("hahah title"),
                   content: String::from("This is the coolest")
               },
               Post {
                   id: String::from("2"),
                   title: String::from("Masai vs Floyd Mayweather"),
                   content: String::from("Masai smashes Mayweather in London")
               }
           ];
       App::new()
       .app_data(web::Data::new(AppState {
           posts: all_posts
       }))
       .service(web::scope("/api")
       .service(blog_post))
   })
   .bind(("0.0.0.0", 8000))?
   .run()
   .await
}
In order for the endpoint to be accessible to the outside, we need to register it with the .service method. We can chain in as many as we want. The scope adds the prefix to our endpoints. So all the services which get added under the api scope will be accessed as http://localhost:8000/api/some/service/path.
The .bind method allows us to choose at what address to make our application available. Here we use 0.0.0.0 which means localhost at port 8000.
Running the server
In order to run the server, we run the following command;
cargo run
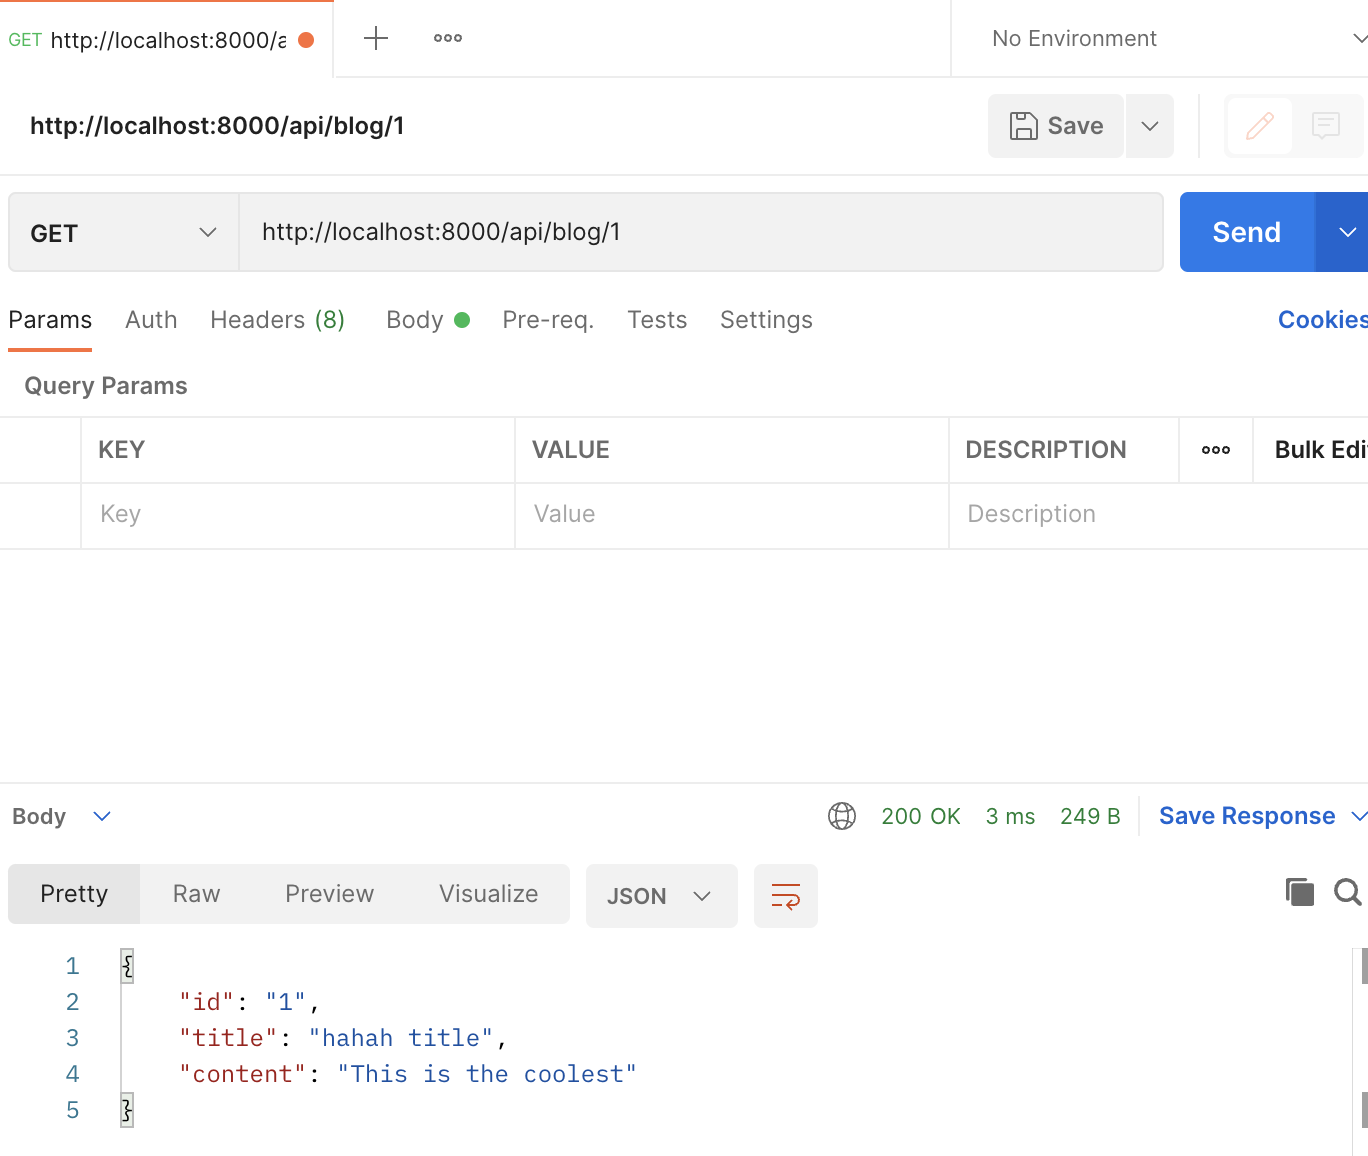
If all goes well, we can now test it out on Postman. GET methods can also be done in the browser. If we send a GET request to http://localhost:8000/api/blog/1, then get the following response`.

Conclusion
Applications tend to have more than what you see when you open your browser. Backends tend to play a vital role in making sure that we as users get to see correct information and have our applications function as well as they do.
Having built a simple backend with one endpoint, I am confident that Rust can be used in production for full stack applications.
Next up I will link the front end to this backend and hopefully we can dynamically retrieve the data. Thereafter, I might even consider connecting a database to store all the blog posts instead of having them locally if that will not be overkill for this demo project.
Thanks for spending some time learning Rust with me. Until next time. Peace ✌🏼 .
